
Hey everyone! Hallowe’en is fast approaching so I thought I’d do my first makeup tutorial for my blog! Over the last year or two, the deer makeup trend for Hallowe’en has been getting very popular. I was never confident enough to try it on me, but this year my makeup skills have grown so much that I decided to give it a shot. It’s actually way more simple than it looks!
It took me about an hour and a half to complete from start to finish, but you could definitely do it in an hour. I had to watch youtube videos for inspiration while I was applying it. The technical skills needed to do this look are so basic. Even if you have very little experience with makeup, I’m positive you can make this look great!
The only downside is that this look is very product heavy. I’ll include all the products I used and I’ll include similar products where I can that are cheaper or that I think would have worked better for someone else (I’m pale- the bronzer I use probably won’t show up on your NW30 skin tone!).
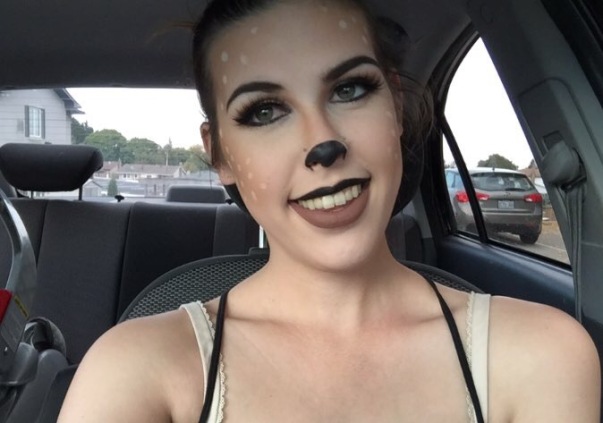
Here’s the look I created! It’s not perfect, but I could leave the house like this without feeling embarrassed. I actually ended up going out for coffee with a friend of mine with my deer face still on, guess I’m overexcited about Halloween! I got a few compliments as well. I’d like to apologize in advance that I don’t have step by step photos for this look. I was unsure how it would turn out, and didn’t think I’d end up posting it on here! Let me know if you’d like more Hallowe’en tutorials and if step by step photos would be helpful to you.
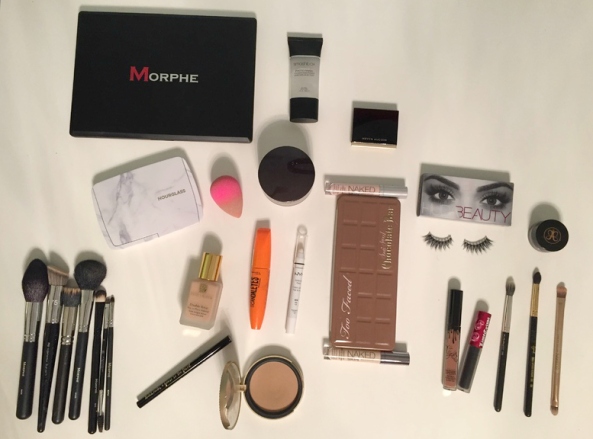
I started off by taking my Smashbox Photo Finish Primer ($44 CAD) and applying that with my finger tips all over my face to create a nice base for my foundation to stick to. I then took my Estee Lauder Double Wear foundation ($46 CAD) and poured some onto the back of my hand. I just recently bought this foundation and I’ve only used it a handful of times- I like the coverage but the shade might be slightly too pink for me, I tend to look better in more yellow foundations. As long as you have a full coverage foundation (it is Halloween of course!) then you should use the one you’re most comfortable with, same goes with primer.
I used my M.A.C Duo Fibre Face Brush ($51 CAD) to buff in my foundation. I’m pretty sure I have the 189 but the number has rubbed off and I can’t find 189 on the website, the one I linked to is almost identical. You want to aim for full coverage.
I then colour corrected my dark circles, because a large part of this look is playing with light and dark areas of the face. As a mom, my circles can get deep blue sometimes which is not a good look for me! I took my Urban Decay Colour Correcting Fluid in pink ($35 CAD) and applied that to my under eye circles with my fingers. For colour correcting, you want to build up the product in small, thin layers. Using your fingers will heat up the product allowing it to spread more evenly. I set that with my Laura Mercier Translucent Setting Powder ($47 CAD) and my Morphe M401 brush ($13.99 USD). I like to set my colour corrector before I conceal so the products don’t scrunch against each other too much.
After colour correcting, I concealed. I used my Urban Decay Weightless Concealer ($35 CAD) and my beautyblender ($28 CAD) in a triangular shape under my eyes (touching the side of my nose!). The next step is what I found the most daunting. I’m going to attribute it to me being pale, but I always do a cool toned contour. So piling bronzer all over my face felt like a nightmare! I’m very glad to say I didn’t look like an oompa loompa.
I used the Too Faced Milk Chocolate Soliel bronzer ($38 CAD), which is the pale girl shade and one of the lightest bronzers I’ve been able to find. Don’t get me wrong, it’s still very warm toned and bronzey, but they formulated it to be not overpowering if you go in with a light hand. I applied this very heavily on my face with my Sephora Brand Pro Angled Contour Brush ($37 CAD). I started where I would normally bronze (cheekbone area) and went up a little bit higher towards my cheekbones, and made it a little bit lower on my face than usual. We need room to put the white dots! I did not put any on my jawline. I used a heavy hand around my temples and hairline as well. I then took my Morphe B70 ($2.99 USD) brush and used my bronzer to create my deer nose. I took this from the start/just under my eyebrow down my nose to just above my nostrils.
I’m a sucker for contouring, and although this look didn’t really need any, I have big cheeks so I did it anyways. I used my Kevyn AuCoin Scultping Powder in shade light ($53 CAD) which I love and have previously reviewed on my blog. You can find that review here. I used the same Sephora brand brush that I bronzed with to sculpt out my cheekbones, however since this is a very warm toned look I kept it minimal. Both my bronzer and my contour powder are matte (I highly prefer a matte face). If you wanted to do a shimmery bronzer, I’m sure that would look great too! It all comes down to personal preference.
Like I said earlier, a large part of this look is playing with dark and light areas of the face. I used my Hourglass Surreal Light palette ($95 CAD) and used the illuminating powder on the left to brighten up my under eye triangle. For this I used the Morphe M105 ($4.99 USD).
The final step to complete the face makeup is the classic white dots. I used my NYX Jumbo Eye Pencil in milk ($6 CAD) to create these dots. I put them on my face randomly, covering the areas that I bronzed earlier. I set these with my Too Faced Semi Sweet Chocolate Bar palette ($59CAD). I used the white shade called Coconut Creme. Taking the same NYX pencil, I applied that to my eyelids and blended it with my finger. This primes the lids and creates a white base for shadows so the colour can really pop!
I started with my Morphe 35O palette ($22.99 USD) and took the burnt orange shade in the middle of the palette and my Sigma E45 brush ($16 USD) to blend into my crease. I wanted to create a warm, doe eye effect and so I blended a bit higher than I normally would. I then took my Too Faced Semi Sweet palette, and using the same brush took the shade Cocoa Chilli in the outer corner of my eye to darken up the look. To finalize the simple shadow, I used the shade Butter Pecan from my Too Faced palette with my Urban Decay eyeshadow brush (it came with my Naked 2 palette, but any flat shader brush will do the job). I then used a clean fluffy brush to blend that into my outer corner and get rid of any harsh lines the shadow had. If you’d like, you can add an inner corner highlight. I used the top left shadow in my Morphe 35O palette.
I filled in my brows as I normally do, using Anastasia Beverly Hills Dipbrow Pomade in the shade Dark Brown ($23 CAD) and the ABH #12 Brush ($23 CAD).
For eyeliner, I recommend using a felt tip over liquid or gel. I used the Too Faced Sketch Marker Eyeliner in black ($26 CAD). I created a normal large wing and carried that down to my tear duct. I lined the bottom of my eye and connected it to the wing. It’s simple other than the fact winged eyeliner hates us and never turns out right. Or even. Or correctly angled.
Since this look is theatrical for Hallowe’en, I wanted to put on some false eyelashes. I used the Huda Beauty Sasha #11 lashes ($22 CAD). Online these are described as a “medium volume, natural lash”… these are the longest lashes I own. I couldn’t wear my glasses because my lashes kept getting stuck on the lenses! I also used the DUO Eyelash Adhesive in black ($12 CAD).
The final steps to this look are the nose and lips! For the deer nose, I used my LimeCrime velvetine in the shade Black Velvet. I’m not linking this product because I no longer support this company, but I purchased this therefore I still use it as I’d rather not waste my money. I took my Morphe M416 ($2.99 USD) and applied it in a circle around my nose, starting from right beside my nostril going up.
I then applied the velvetine to only my top lip, and let it fully dry down. I then used my Kylie Cosmetics Lip Kit in Dolce K ($29 USD) on my bottom lip. I kept my mouth open while this dried to avoid transfer.
So there you have it! Your complete written tutorial to recreate this awesome Deer/Doe/Fawn makeup look! If you recreate this look, let me know!
Do you want to see more Hallowe’en looks? We still have 13 days left this year!
xo,
Cosmetic Royalty

[…] products, and I couldn’t agree more. For my deer Hallowe’en tutorial (found here) I used this in my under eye triangle to create an illuminated glow. This is perfect for days where […]
LikeLike
[…] style” lash, however they are the longest lashes I own, and fairly full. I used these in my Deer Makeup Tutorial. Lashes can get pretty pricey, and these retail for $22 CAD. These make the perfect addition to a […]
LikeLike